Hey there, fellow WordPress enthusiasts! In this article, we’re going to show you the ropes of connecting your WordPress forms to your email marketing software. So, if you’re looking to level up your email game and grow your mailing list, you’ve come to the right place. Let’s dive right in!
Choosing the right email marketing software
Before we get into the nitty-gritty of connecting WordPress forms to email marketing software, you need to pick the best platform for your needs. Some popular choices include Mailchimp, Constant Contact, MailerLite, SendinBlue (now Brevo), and ConvertKit. Each has its own unique set of features, so take the time to research and compare them before making a decision.
When selecting an email marketing software, consider the following factors:
- Features: Check out all the awesome stuff each platform has to offer, like automation, segmentation, rad templates, and super useful reports. Go for the one that clicks with your marketing style and sets you up for total success!
- Pricing: Give those pricing plans a once-over and find the one that’s easy on your wallet. You’ll see some platforms rockin’ free plans with a few limits on features or subscribers, while others have a tiered pricing game based on your email list size or the features you need.
- Integration: Make sure your email marketing software plays nicely with your fave WordPress form plugin. That way, you’ll have a smooth-sailing integration process.
- Support: Scope out the customer support scene for each platform – live chat, phone support, or a jam-packed knowledge base. Trust us, having solid customer support on your side is a game-changer when you need a helping hand.
- Scalability: As your email list and business keep growing, you’ll want an email marketing platform to keep up with the pace. Pick one that’s got plans and features ready to handle your future growth like a champ!
By considering these factors, you’ll be better equipped to select the right email marketing software for your needs.
Choosing a WordPress form plugin
Now that you’ve sorted your email marketing platform, it’s time to choose the perfect WordPress form plugin. There are tons of options out there, and each one offers unique integrations with different email services. So, pick the one that fits your needs like a glove and feels like second nature to you. Some of the fan-favorite form plugins include WPForms, Contact Form 7, Ninja Forms, Formidable Forms, and Gravity Forms.
For this article, we’re gonna use Happyforms since it works nicely with many of the best email marketing software out there. So, make sure you’ve got it installed on your site and ready to roll as we dive in together!
Integrating with email marketing software
Now that you’ve got Happyforms installed let’s jump right into integrating your favorite email marketing software with your snazzy new Happyforms form. Follow the step-by-step guide below, and your form will be connected with your email marketing software in no time.
1. Get your email marketing software API/secret keys
Before you can hook up your email marketing software with Happyforms, you’ll need to grab your API/secret keys. Here’s a quick rundown of how to snag those keys for some popular email marketing platforms:
Mailchimp
- Login to your Mailchimp dashboard, and on the top right, click your avatar and select “Account & Billing” from the menu that shows up.
- From the Account screen, click on the “Extras” menu and click on “API keys“.
- Under the “Your API keys” table, click on the “Create New Key” button.
- In the “New API key” screen, add the name of your new API and click the “Generate Key” button.
- Then once the API key is generated, click the “Copy to Clipboard” button and keep notes of your API key.
Constant Contact
- Login to your ConstantContact developer account.
- Then go to “My Account“.
- Click on the “Applications” tab and click the “Create a New Application” button.
- Fill in all the required details in the “Register Your New Application” form and click the “Register Application” button.
- Your newly created application’s API key and secret key will be shown to you. Be sure to keep notes of these keys.
SendInBlue (now Brevo)
- Login to your Sendinblue (Brevo) dashboard.
- Click your Avatar on the top right, and select “SMTP & API“.
- In the “SMTP & API” screen, hop over to the “API Keys” tab and click the “Generate a new API key” button.
- Add the name of your API key and click the “Generate” button.
- Keep notes of the API key that will be shown on the next screen.
Convertkit
- Log in to your Convertkit dashboard and click your Avatar located in the top right and select “Settings“
- Click the “Advanced” link on the left sidebar in the Settings screen.
- In the Advanced screen, go over to the API section and take note of the API and secret keys.
2. Connect Happyforms to your email marketing software
With your API and secret keys in hand, it’s time to link Happyforms to your email marketing software.
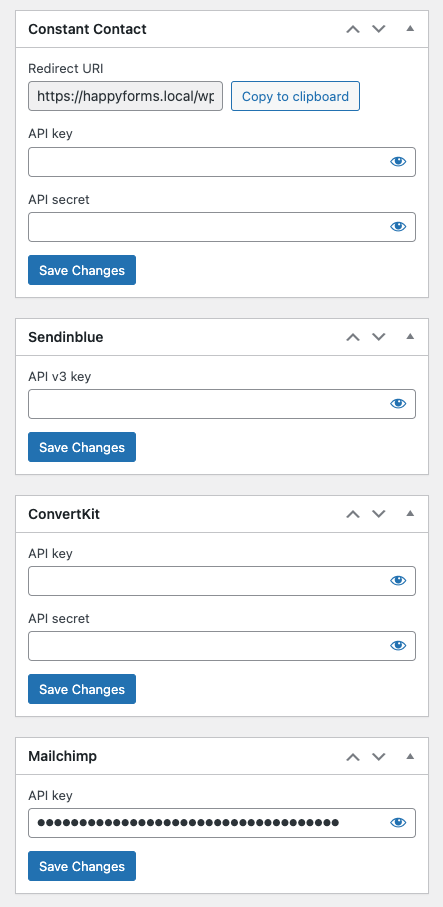
Head to your WordPress dashboard, then swing by the Forms → Integrations screen. Look for the widget for your chosen email marketing platform, and add in those API and secret keys you’ve got.

3. Setup your form to use your email marketing software integration
Before we dive into this step, double-check that you’ve created a form and added at least one Email field.
- Hop into your form editor and hit the Email tab in the form builder.
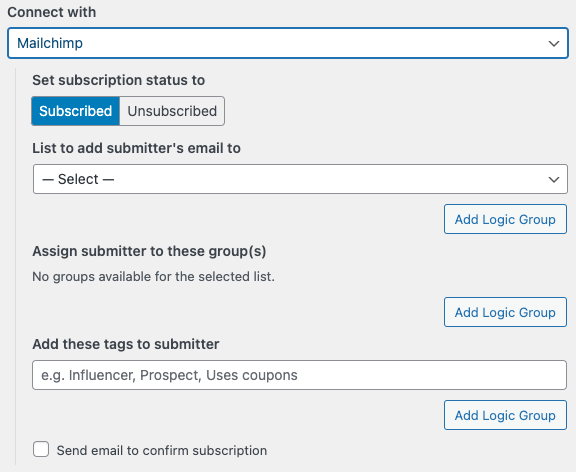
- Find the “Connect with” dropdown and choose the email marketing platform you want to connect.
- Fine-tune your integration settings! Pick either subscribe or unsubscribe for the subscription status. And remember to select the list for adding users and any other available options your platform offers – like groups, tags, you name it!

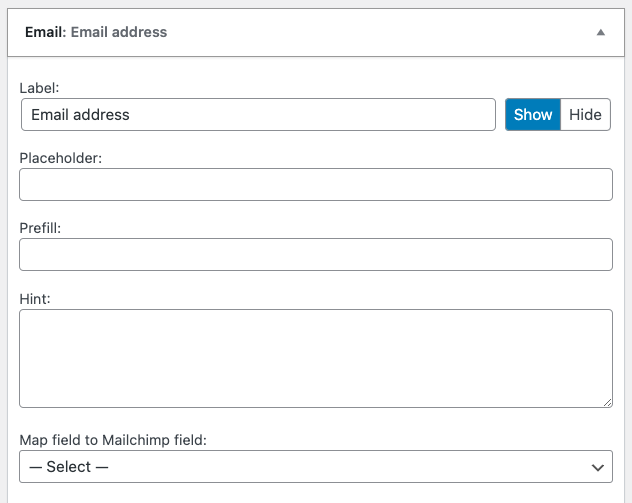
- Go back to the Build tab of your form builder and expand the first Email field.
- You’ll see a new field below the Hint settings. It’ll be labeled with something like “Map field to [email marketing software name] field“. Go ahead and pick Email or “Email address“. And if your platform’s up for it, you can map other form fields too!

- Last but not least, hit the Update button to save your form!
And that’s it! Your form is now fully connected to email marketing software. And be sure to test it out and tweak the settings accordingly.
Best practices for connecting forms to email marketing software
Now that you’ve successfully connected your WordPress forms to your email marketing software keep these best practices in mind to maximize your results:
- Create clear and concise forms: Keep your forms simple, asking only for essential information. This will increase the likelihood of form submissions.
- Use double opt-in: To ensure GDPR compliance and improve the quality of your email list, enable double opt-in for your forms.
- Segment your lists: Organize your subscribers into segments based on their interests, preferences, or behavior. This will help you send targeted email campaigns and improve engagement.
- Test and optimize: Regularly test your forms and their integration with your email marketing software. Adjust your form design, copy, or placement to optimize conversions.
- Track and analyze: Monitor your form submission data and use it to make informed decisions about your marketing strategies.
Conclusion
Connecting your WordPress forms to email marketing software is a powerful way to streamline your marketing efforts and boost lead generation. With the right form plugin and email marketing platform, integration is simple and straightforward. By following best practices and continuously optimizing your forms, you’ll be well on your way to achieving your marketing goals. So go ahead, and take your email marketing campaigns to the next level!
