Hey there, digital dynamos! Are you struggling to streamline your email marketing efforts? Ever heard of Mailchimp, the mighty email automation tool? It’s one of the best email marketing platforms out there, and guess what? You can connect it to your WordPress forms using a fantastic plugin called Happyforms. In this article, we’re going to give you the low-down on this brilliant process. So, buckle up and let’s get started!
Why Happyforms?
Now, why would you want to go for Happyforms when there are dozens of form plugins available for WordPress? Well, Happyforms isn’t just any form builder. It’s an easy-to-use, highly customizable tool that helps you design beautiful forms without breaking a sweat. Moreover, with the premium version, you get exclusive access to a plethora of features, including the much-coveted integrations, yes, including Mailchimp! Try installing now!
Setting up Happyforms
Before we talk about connecting to Mailchimp, let’s take a step back. How do we create a form using Happyforms? It’s as easy as pie!
Install Happyforms
First things first, you need to have the Happyforms premium version. If you haven’t gotten your hands on it yet, don’t worry. You can grab it right here.
With the premium version in your toolbox, you’re ready to install it onto your website. If you’re a bit stuck, we’ve got your back! Follow our easy-to-understand installation guide here. Once you’re done, you’re one step closer to a seamless email marketing experience.
Create a form
Next, you need to create your form. Navigating this is as easy as ABC. Head to the “Forms” menu and click the “Add New” link. It’s time to let your creativity flow! Add all the fields your form needs.
Here’s a crucial tip—make sure to include at least one Email field. Why? It’s the key to capturing your leads and channeling them straight into your Mailchimp account. Need a deeper dive into form creation? Check out our detailed guide here.
Get your Mailchimp account ready
Before connecting your shiny new form to Mailchimp, let’s set up your Mailchimp account. No account yet? Not a problem! You can easily create one here.
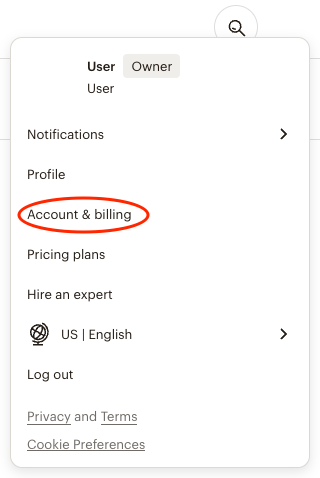
Logged into Mailchimp? Great! Now, let’s get you an API key, which is crucial for Happyforms integration. Navigate to the “Account & Billing” screen by clicking on your account icon on the top right corner and then selecting “Account & Billing“.
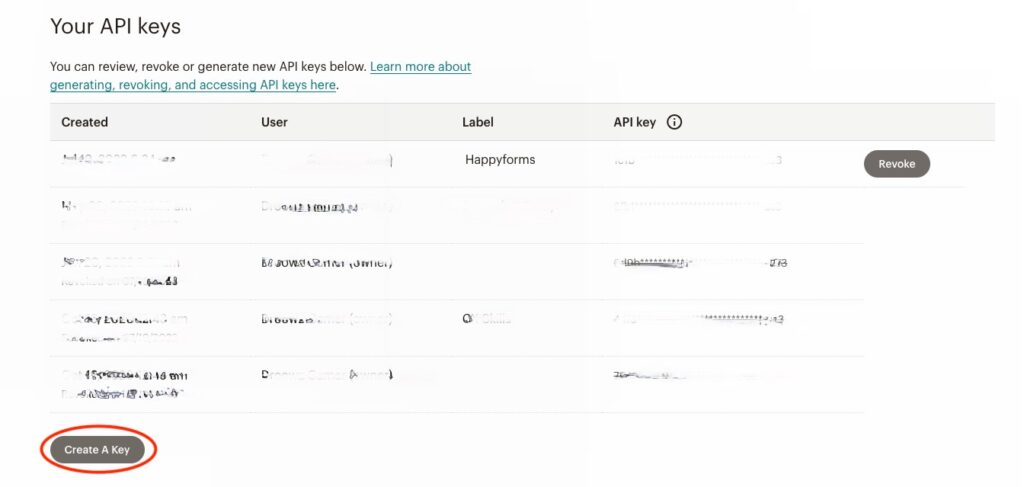
From this screen, hover over the “Extras” tab and choose “API keys” from the dropdown menu to go to the “Your API keys” screen. And click on “Create A Key” button to create a new API key for your integration.
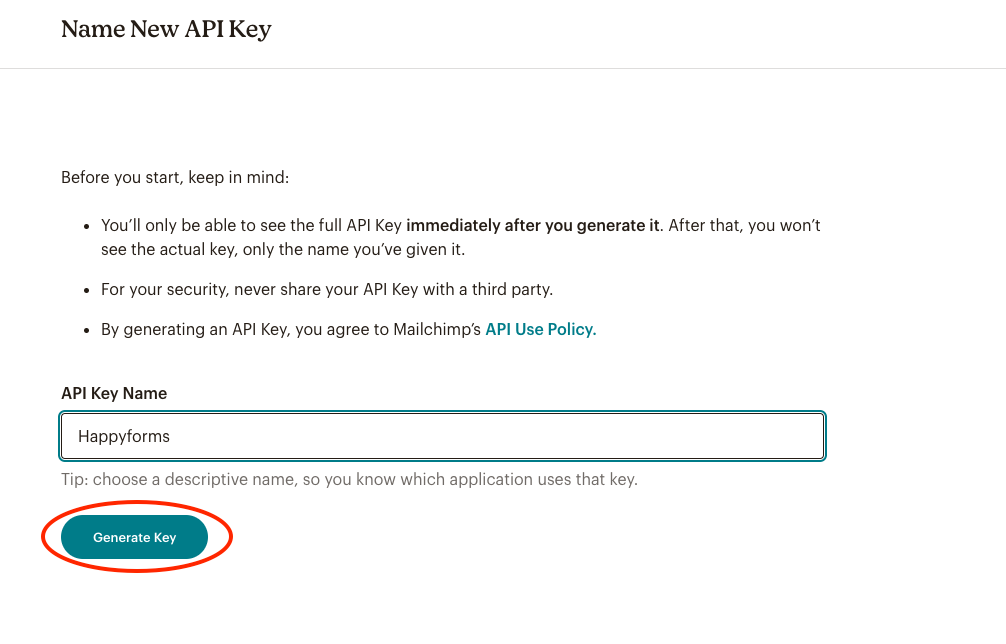
In the new API key screen, give a relevant name to your key and click “Generate Key” to generate a new one.
Voila! Your new API key is generated. You’ll be directed to the “Copy New API Key” screen. Take a moment to copy and safely store this key, then hit the “Done” button and that’s it. Your Mailchimp account is now ready.
Connecting Happyforms to Mailchimp
Now, with your form crafted and your Mailchimp API key at hand, it’s time to connect the dots. Here’s how you can effortlessly start capturing leads from your website to your MailChimp lists.
Add your API keys to Happyforms
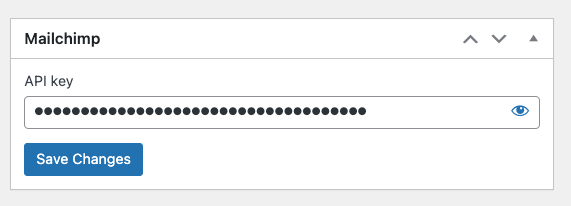
To kickstart the connection process, you’ll need to input your Mailchimp API key into Happyforms. To do this, head over to Forms → Integrations. Found the Mailchimp widget? Great! Now, just enter your API key into the provided field and hit the “Save Changes” button.
Configuring your connection settings
Next up, it’s time to configure your form connection settings to your Mailchimp account. Edit your form and move to the “Emails” tab of the form builder. In the “Connect with” dropdown, pick “Mailchimp“. For “Set subscription status to“, choose “Subscribed“. And, here’s the crux—select the list in the “List to add submitter’s email to” dropdown, where your leads will be stored.
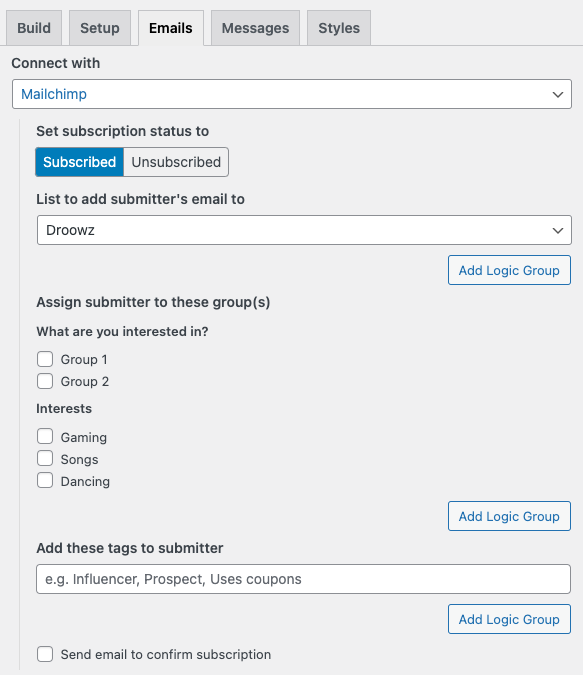
Want to categorize your leads into different groups? You’ve got that option too! Once you’re happy with your settings, don’t forget to click the “Update” button to save them.
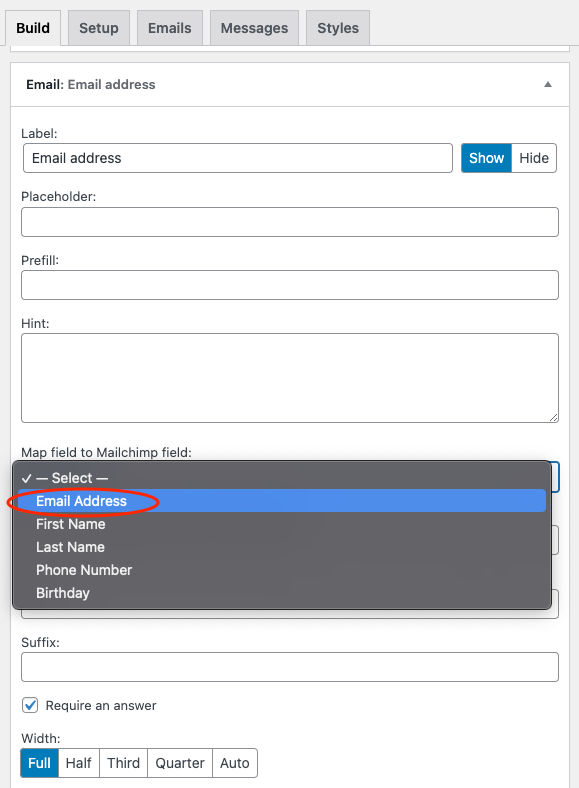
Mapping form fields to MailChimp fields
Here comes the final part! You’ll need to connect your form fields to your Mailchimp fields to ensure the proper storage of your leads’ information. Remember the Email field we insisted on? Here’s its moment to shine. Mailchimp requires this to save a lead to your list.
To do this mapping, go to the “Build” tab of your form, expand your Email field, and from the “Map field to Mailchimp field” dropdown, select “Email Address“. You can also map other form fields to your Mailchimp fields as needed.
Once you’re done with all the field mappings, save your form. And guess what? Your form is now connected to your Mailchimp account! You’ve just leveled up your lead capture game!
Why the integration is beneficial
So, what’s the big deal about this integration? By connecting Happyforms to Mailchimp, you’ve essentially streamlined your email marketing efforts. Every time a visitor submits a form, their information is instantly synced to your Mailchimp list. No more manual data transfers, no more mistakes, just smooth, automated data flow. This means more time for you to focus on crafting those killer email campaigns and engaging with your audience better!
Conclusion
Phew! That wasn’t so bad, was it? You’re now a pro at connecting WordPress forms to your Mailchimp account using Happyforms. Remember, consistency is the key to any successful email marketing campaign, and this Happyforms-Mailchimp integration is your first step towards that. So, are you ready to supercharge your marketing efforts? It all starts with Happyforms!
With this guide, you’ve unlocked a new level in your digital marketing game. So make the most of your Happyforms premium plugin, and watch your email marketing reach new heights!
Stay tuned for more helpful tips and tricks. Happy form building, folks!