Online payment processing has become essential for companies, independent contractors, and even nonprofit organizations in the current digital era. The well-known WordPress form builder Happyforms provides an easy-to-use method for creating payment forms, and when combined with PayPal, it facilitates safe and easy transactions. To ensure you can begin accepting payments with ease, we’ll walk you through the process of integrating PayPal with your Happyforms payment forms in this in-depth guide.
Table of Contents
- Setting Up Your PayPal Account
- Creating Your Payment Form in Happyforms
- Testing Your Payment Form
- Finalizing Your Payment Form
1. Setting Up Your PayPal Account
Ensure your PayPal account is set up correctly before integrating it with Happyforms. Follow these steps:
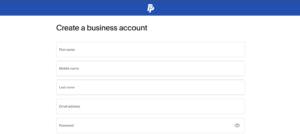
Step 1: Create a PayPal Business Account
- Create a PayPal business account if you haven’t got one.
- Enter your company details and connect your bank account to begin receiving payments.
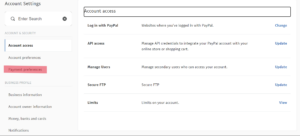
Step 2: Enable PayPal Standard or PayPal Checkout
- Log in to your PayPal Business account
- Navigate to Account settings > Payment Preferences
- Under the “Website Payment” select PayPal Standard or PayPal Checkout, depending on your needs.
- Take note of your PayPal Merchant ID and API credentials (client ID and Client Secret), which will be needed for integration with Happyforms.
2. Creating Your Payment Form in Happyforms
The next step is to use Happyforms to construct your payment form if your PayPal account is ready.
Step 1: Install and Activate Happyforms Pro
- In your WordPress dashboard, navigate to Plugins > Add New Plugin.
- Click Upload Plugin then select the file of Happyforms Pro that you downloaded after purchase.
- Once installed, activate the plugin to begin using it.
You can follow this guide at the Happyforms help page: https://help.happyforms.io/en/articles/2149313
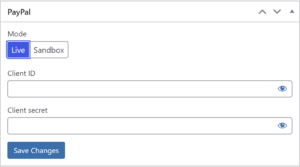
Step 2: Integrate PayPal to your Happyforms
- From your WordPress dashboard head to Forms > Integrations
- Find PayPal, then click Live to connect your actual account. You can also use the sandbox mode if you want to test the form first. Input the required client ID and client secret. Once you are done, hit save changes.
Step 3: Create a New Payment Form
- From your WordPress dashboard head to Forms > Add new
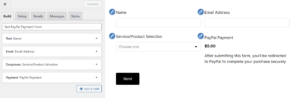
- Add form fields relevant to your payment process, such as:
- Name
- Service/Product Selection
- Payment Amount
Step 4: Add the PayPal payment field
- Click the add a field button then find the payment field
- Configure it according to your preference.
Step 5: Customize Form Behavior
- You can select the fields you want to add to the payment details.
- Require submitters to review their submissions.
- Enable email notifications to confirm successful payments.
- Add custom confirmation messages that show up after a user completes the form.
You can also use the Happyforms Payment Form template. After downloading the template just head to Forms > Import then upload the .xml file of the template. You will be able to find the template in the All Forms tab.
3. Testing Your Payment Form
It’s crucial to test your payment form before going live to make sure everything functions properly.
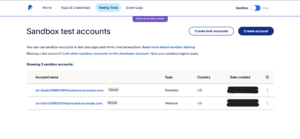
Step 1: Set Up a PayPal Sandbox Account
- To test payments without handling actual transactions, PayPal offers a Sandbox mode.
- Create a Sandbox account on the PayPal Developer Dashboard to gain access to this.
- Use the sandbox credentials (client ID and client secret) in the Happyforms Integration for testing purposes, don’t forget to select sandbox at the integrations tab.
Step 2: Test the Payment Process
- Choose the service or product you want and fill out the payment form as though you were a customer.
- Make sure the payment amount and information are accurate when you are taken to PayPal.
- Verify that you received the email or confirmation message after being successfully redirected back to your website.
Step 3: Check Your Test Payments
- Log onto the PayPal Sandbox account to verify whether the test payment was successful.
- Verify the transaction details to make sure everything is operating as it should.
4. Finalizing Your Payment Form
Enter your real PayPal login information to move from Sandbox mode to live mode after you’ve tested the form, and everything is functioning as it should.
- Double-check all form settings, including the PayPal email and payment amount options.
- Publish the form by embedding it into a page or post on your WordPress site.
Conclusion
Accepting payments straight on your WordPress website is made possible by integrating PayPal with Happyforms. The procedure is easy and safe, regardless of whether you’re collecting donations, selling goods, or providing services. You can easily make a polished payment form that manages transactions by following these detailed instructions. To keep everything functioning properly, test your form before going live and monitor payments using your PayPal dashboard. You may now start using PayPal and Happyforms to receive payments!