When you’re running a WordPress site, engaging your audience is key. One surefire way to keep them engaged is through newsletters and email marketing. In today’s piece, I’ll walk you through how to set up an AWeber form on your site with the help of, yes, you guessed it, HappyForms!
Why do you need forms on your site?
Before we get all technical, let’s have a quick chat about why forms are so essential for your website. Imagine your website as a two-way street. While you give information to your audience, you also need a way for them to reach out to you, be it for inquiries, feedback, or to sign up for your stellar content. That’s where forms come into play!
Choosing a form plugin
Now, with a plethora of form plugins available, the choice can be overwhelming. Should you go for the fanciest one with all the bells and whistles? Or the newbie on the block? Here’s our take: Always go with something that’s proven, user-friendly, and reliable. And where Happyforms comes into play!
Why choose Happyforms?
- Easy to Use: Even if you’re new to WordPress, Happyforms makes creating forms as simple as baking cookies with a pre-made mix.
- Fully Customizable: Want your form to look a certain way? No problem, Happyforms has your back!
- Integration with AWeber: That’s what you’re here for, right? And it couldn’t be more straightforward.
- Stellar Support: Got a question? They’ve got your back. Every time.
Setting up Your AWeber Form using Happyforms
Let’s get down to business. Here’s a step-by-step guide to get your AWeber form up and running in WordPress using Happyforms:
Step 1: Setup an AWeber account
To connect a form to AWeber, you must first establish an AWeber account. If you haven’t done so, their website is the place to create one. After setting up your account, navigate to the ‘List’ screen and create a list for your leads. Should your list require custom fields, it’s advisable to add them at this stage to ensure they match with your form fields later on.
Step 2: Install Happyforms
If Happyforms isn’t part of your WordPress toolkit yet, now’s the time to make that change. With its premium features, it’s truly a game-changer for form creation. Ready to get started? Here’s how:
- Grab your premium Happyforms: Haven’t got it yet? No worries. Grab the premium version of Happyforms right here.
- Download Happyforms: After you’ve purchased Happyforms, download the plugin files.
- Upload the Plugin: Login to your WordPress dashboard and head over to the ‘Plugins’ section on the left sidebar. Click on ‘Add New’ at the top, then ‘Upload Plugin’. Choose the Happyforms ZIP file that you’ve just downloaded.
- Install & Activate: After uploading, click ‘Install Now‘. Once installed, the button will change to ‘Activate‘. Click on it, and voila! Happyforms is now part of your WordPress arsenal.
And just like that, you’re set and ready to create some amazing forms. Need help installing Happyforms? Check out our handy guide here.
Step 3. Link Happyforms to your Aweber account
Now that you have your AWeber account and Happyforms installed, you can now link them. It’s very easy to do this. Just follow the steps below.
- Go to your WordPress dashboard and head over to the Forms → Integrations screen.
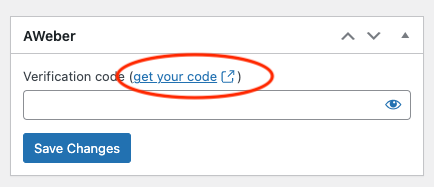
- Look for the AWeber widget and click the “get your code” link.
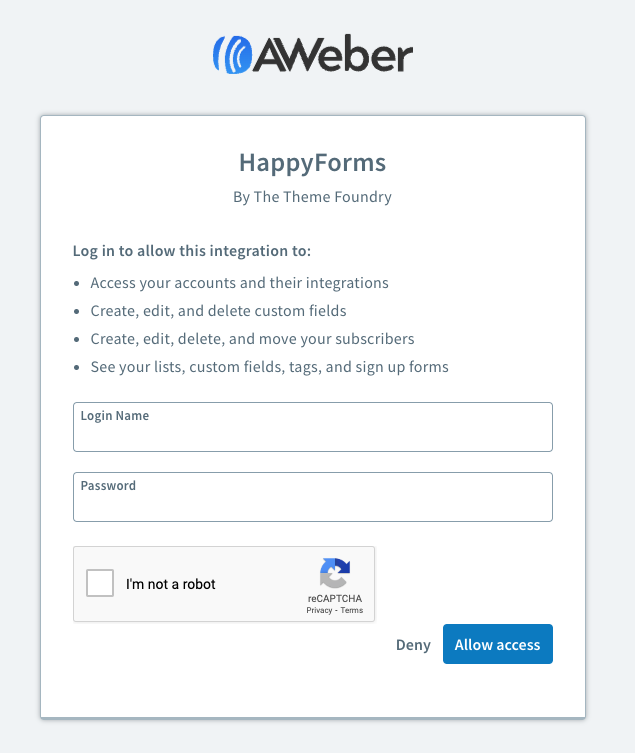
- You will be directed to AWeber’s login screen to allow your Happyforms installation access to your AWeber account. Write your login credentials and click the “Allow access” button.
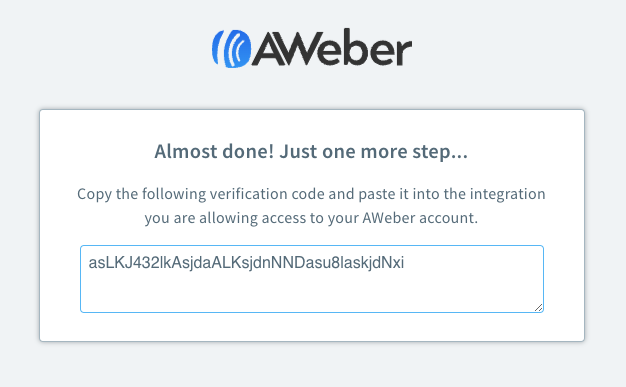
- Next up, you’ll see a verification code (it’s like the one in the screenshot below). Jot that down or copy it.
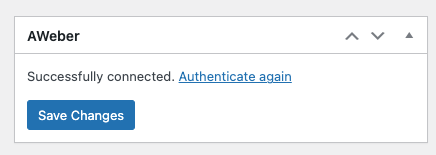
- Hop back to Forms → Integrations in your WordPress dashboard, drop that code into the AWeber widget, and click “Save Changes“. If all’s good, you’ll see a “Successfully connected” message.
That’s it! Super easy, right? Now that Happyforms is linked to your AWeber account, they can now work seamlessly together.
Step 4. Create a form
After successfully installing Happyforms, you’re just a few clicks away from crafting your perfect form. Here’s how you can quickly set things up:
- Navigate to Forms: On your WordPress dashboard, hover over the “Forms” menu item.
- Kickstart Your Form Creation: Click on the “Add New” option. This is where the magic begins!
- Name Your Form: Before diving into field customizations, give your form a distinctive name to easily identify it later.
- Pick Your Fields: Happyforms presents you with a myriad of field choices. Whether you need a basic ‘Text‘ field or a specific Dropdown option, it’s all there.
- Customize Away: Adjust and tweak the fields to align with your requirements—be it Name, Email, Phone Number, or anything else your heart desires.
- Save Your Masterpiece: After adding and customizing your desired fields, hit the save button. Your form is now ready for action!
Step 5. Connect your form to your AWeber account
The next step is connecting your form to AWeber. Don’t worry it’s super easy!
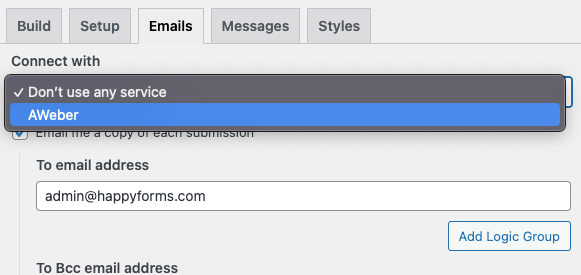
- In the form builder, click the Emails tab. From the “Connect with” dropdown, pick AWeber.
- Choose “Subscribed” for the “Set subscription status to” option.
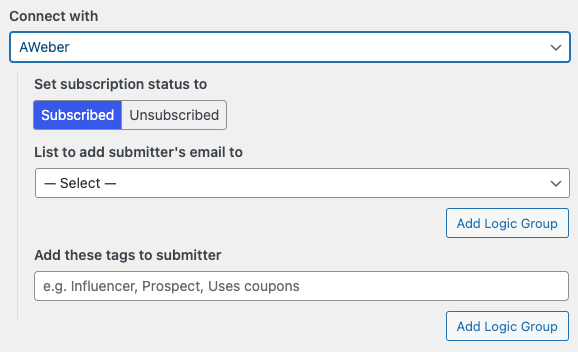
- For “List to add submitter’s email to“, select your desired AWeber list.
Step 6: Link Happyforms and AWeber fields
Lastly, you need to map your form fields to AWeber fields. It is required that you map at least one Email field to your AWeber field so that leads are saved to your list. Here’s how you can do it:
- Pop into the Build tab in your form builder and open your Email field.
- Find the dropdown labeled “Map field to AWeber field” and choose “Email address“.
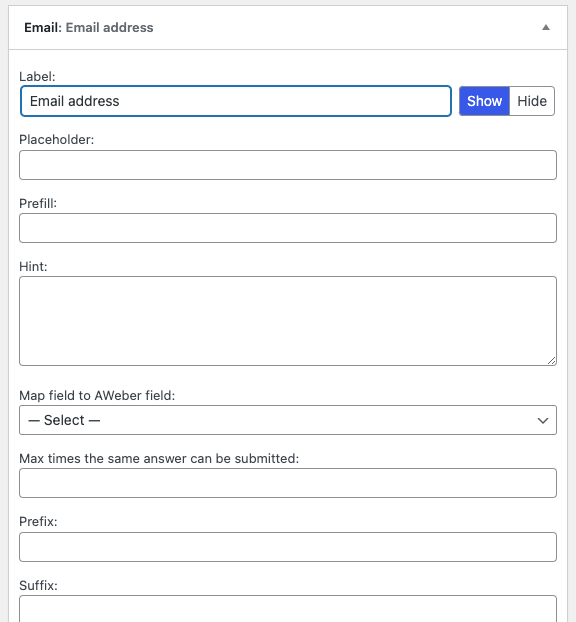
You’re set with the email. If you want, you can link other form fields to AWeber too if you need to save other information like Name, Phone, etc.
Done and dusted! Now, each form submission will zip straight into your AWeber list. Easy, right?
Conclusion
There you have it! A beautiful AWeber form in WordPress using Happyforms. While there are a ton of form plugins out there, Happyforms genuinely makes the process painless and fun.
So, why not give it a whirl and see how it transforms your form creation game in WordPress? And if you have questions or just want to share your experience, drop us an email. Happy form-building! 🎉