Popup forms are super handy for websites, letting you gather important info, connect with visitors, and maybe even snag some new customers. But here’s the thing—WordPress doesn’t have a built-in form or popup feature. No worries, though! In this tutorial, we’ll take a look at the benefits of using popup forms and guide you in making one on your WordPress site, step by step. Follow along, and you’ll be a popup form whiz in no time!
What are popup forms?
Popup forms are a type of web element that suddenly appears over a website’s content, typically triggered by user actions or after a specific time has passed. They’re incredibly handy and can be used for a bunch of different tasks that help you engage with your audience and grow your online presence, like:
- Gathering email addresses for your awesome newsletters
- Promoting irresistible special offers to grab attention
- Getting feedback by surveying your audience on their thoughts and preferences
- Encouraging folks to spread the word about your content through social media sharing
- Displaying important announcements or updates to keep everyone in the loop
Why use a popup form?
Here are four reasons why using a popup form is great for your website:
- Increased conversion rates: Popup forms are great at getting results compared to other forms that are on your site. Why? Because they’re super attention-grabbing, that’s why!
- Customizable design: You can make your popup forms match your website’s style and branding, so everything feels like it belongs together. No awkward, mismatched popups!
- Versatile functionality: Whatever you need them for, popup forms got your back. They’re easy to tweak and customize to suit your unique goals.
- Better user engagement: With a well-crafted message or offer, popup forms can really strike a chord with your visitors, making them want to jump in and take action.
What you need to create a popup form
WordPress lacks built-in form and popup functionality, but that’s no problem! All you’ll need is to install plugins that have these features to fill in the gaps. So, for this tutorial, we’re gonna use Happyforms (comes with free and premium version) as our go-to form plugin and we’ll also show you how to make some really great popups with two of the popular popup plugins available—Popup Maker and Popup Builder. By the end of this tutorial, you’ll have a good grasp of these plugins, making your website pop with engaging forms for your visitors!
How to make a popup form
Create your form
Ready to make some popup forms? First, let’s create a form.
- Go to Forms → “Add New” to start creating your form.
- Give your form a catchy title so it’s easy to identify.
- Under the Build tab, use the drag-and-drop interface to add fields to your form. Click on the “Add a field” button to see all available fields.
- Next, jump over to the Setup tab and tweak your form’s settings.
- Then, head over to the Email tab and set up those handy email notifications for your form.
- And if you’re feeling fancy, visit the Message and Style tab to personalize labels/messages and add some custom styling to your form.
Check out our documentation guide for more information about creating a form.
Create a popup
Once you’ve created your form, it’s time to build a popup where you’ll add your form. Below are the step-by-step guide on how to make a popup using three of the popular popup plugins. Install the popup plugin of your choice and then follow the guide below.
Using Popup Maker
Head to your WordPress dashboard and click on ‘Popup Maker‘ → ‘Create Popup‘. Choose a unique name for your popup and type it into the ‘Popup Name‘ field.
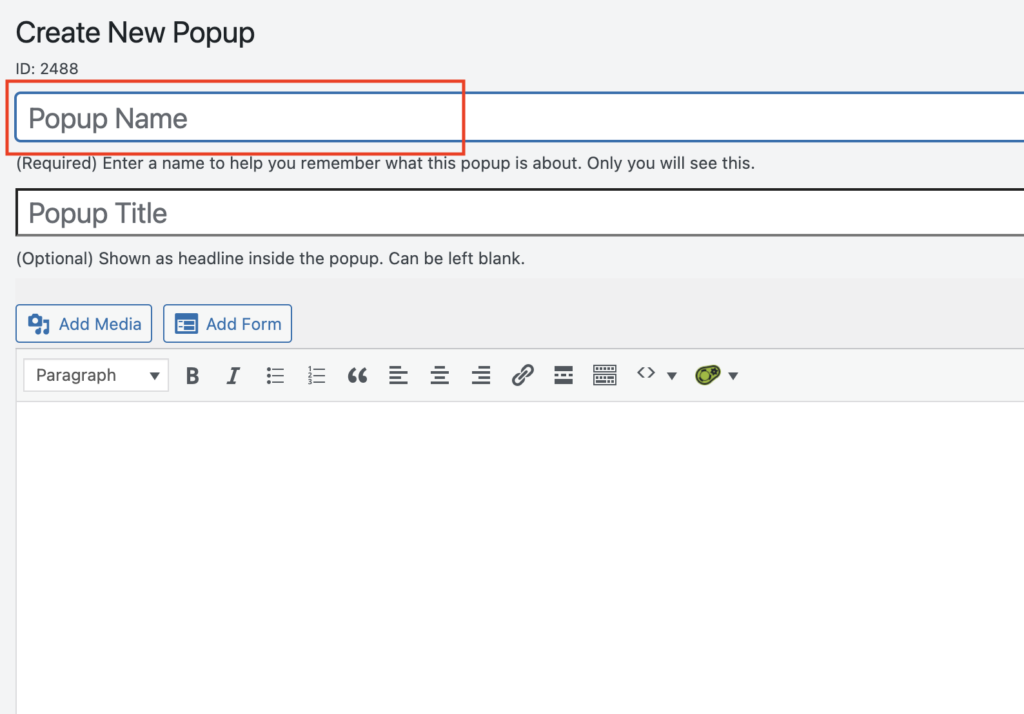
Now create your popup content in the ‘Popup Content’ section! Add your text or HTML content, and don’t forget that you can use the editor’s tools to format your text, insert images, and more, making your popup shine.
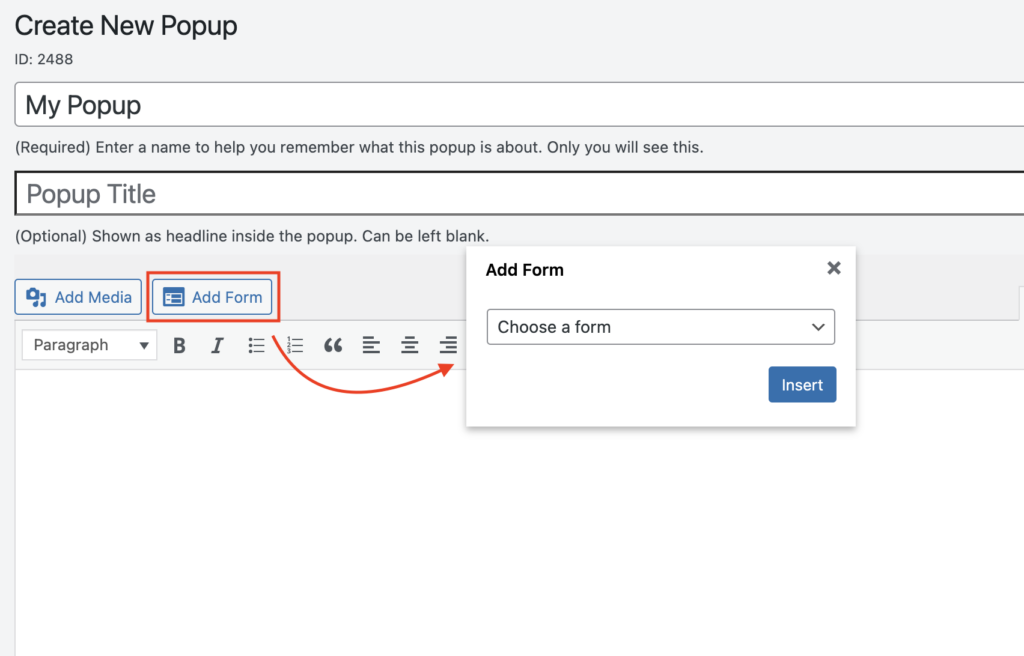
To add your form, click the Add Form button at the top of the popup content editor, and a form selector will show up. Pick the form you want to put in the popup from the dropdown and hit the Insert button after.
Next, get those popup triggers set up! Head over to the ‘Triggers‘ tab in ‘Popup Settings‘ metabox and click the ‘Add New Trigger‘ button. Choose a trigger type that fits your needs, like ‘Click Open‘, ‘Auto Open‘, or ‘Form Submission‘. Tweak the settings as you see fit—maybe change the delay or click selector for the ‘Click Open‘ trigger.
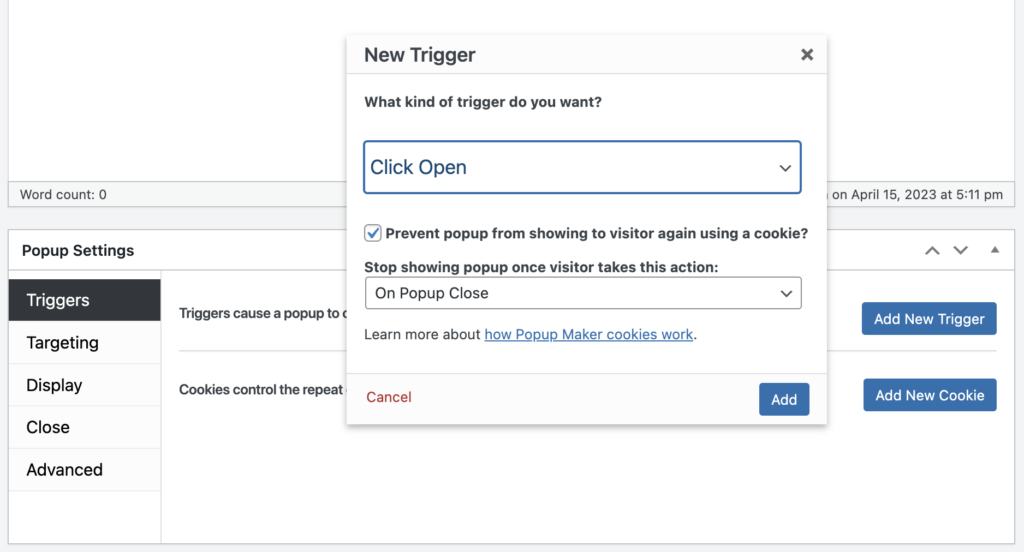
Once you’re happy with your choices, hit ‘Update‘ or ‘Publish‘ to save your work.
If you want your popup to show up only on specific pages/posts, post types, or devices, head over to the ‘Targeting‘ tab in ‘Popup Settings‘ metabox and adjust the conditions to your liking. Here, you can play around with the conditions and fine-tune them to suit your needs. Like targeting specific post types or hiding the popup from certain devices. Your popup will be tailored to your preferences, showing up exactly where you want it, making the website experience even more personalized for your visitors.
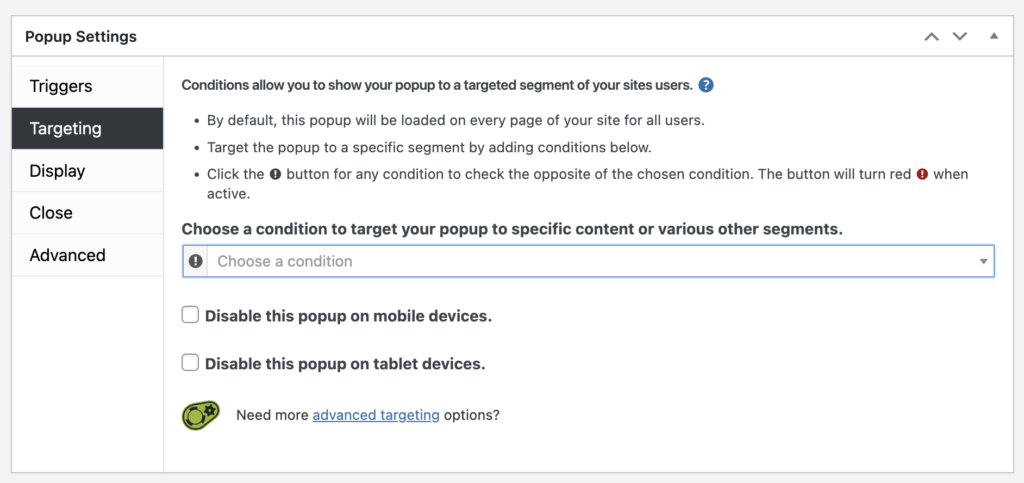
You can make your popup more fancy by adjusting the settings within the ‘Display‘ tab under the ‘Popup Settings‘ metabox. Tweak the popup’s type, appearance size, animation, and position using the available settings.
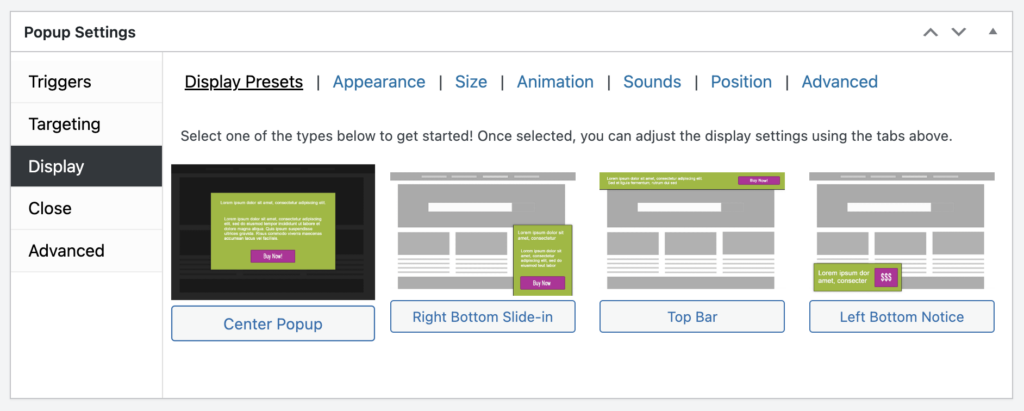
And if you want to give your popup a unique touch, you can create your very own custom popup themes easily. Just head over to the ‘Appearance‘ → ‘Popup Themes‘ screen. From there, you’ll find the screen that lets you design and craft a one-of-a-kind theme that’ll make your popup truly stand out, adding that extra pizzazz to your website.
Once you’ve made all those cool changes to your popup, don’t forget to hit the ‘Publish’ button to save it. With that done, your popup will be live and ready to greet your website visitors! As long as the trigger conditions are met, it’ll pop up right on the front page, making your site more engaging and interactive. So, go ahead, click ‘Publish’ and let your masterpiece shine!
Using Popup Builder
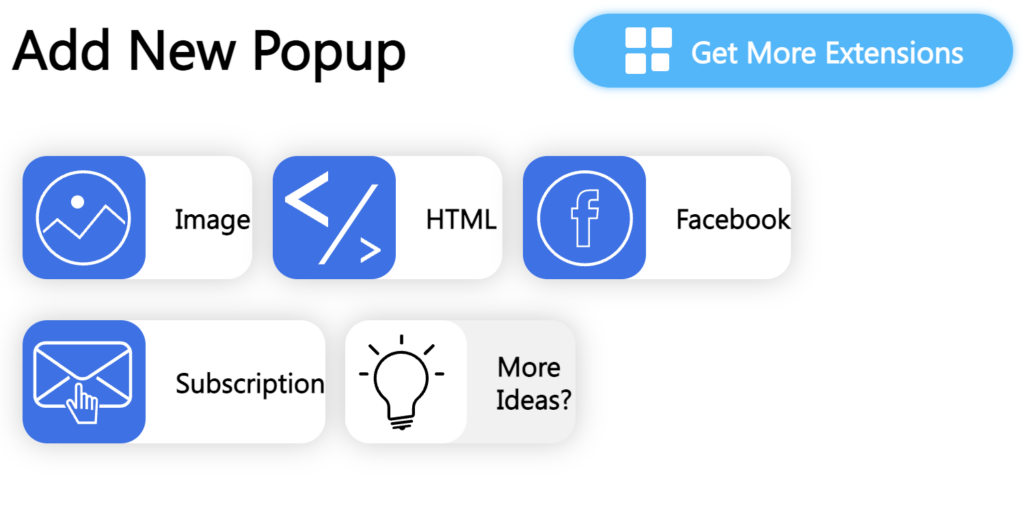
To create a popup using Popup Builder, hop over to the ‘Popup Builder‘ → ‘Add New‘ screen. Then, pick a popup type fits your requirements, like HTML, Image, Facebook, or Subscription. Usually for a form popup, you have to select, either HTML or Subscription type.
Next, give your popup a standout title that’ll help you identify it easily. And to add your form to the popup content, just add the ‘Forms‘ block, pick the form you want to put into your popup, and hit that ‘Insert‘ button.
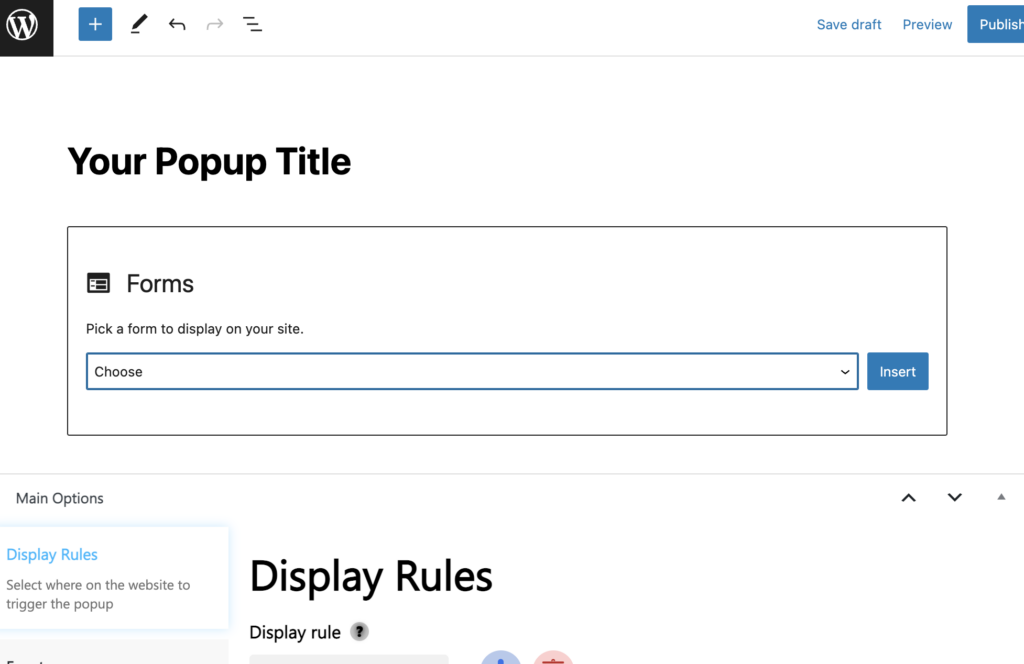
Next is start tweaking the popup settings! You’ll find all the customizable options you need in the ‘Main Options‘ metabox, located right below the visual builder. Go ahead, play around with those settings and make your popup truly one-of-a-kind. Your visitors will appreciate the personal touch, and your website will be poppin’ in no time!
In the ‘Display Rules‘ tab, you’ll find all the options to pick which pages, posts, post types, or sections of your site will get to showcase your awesome popup. Customize those settings and make sure your popup appears exactly where you want it.
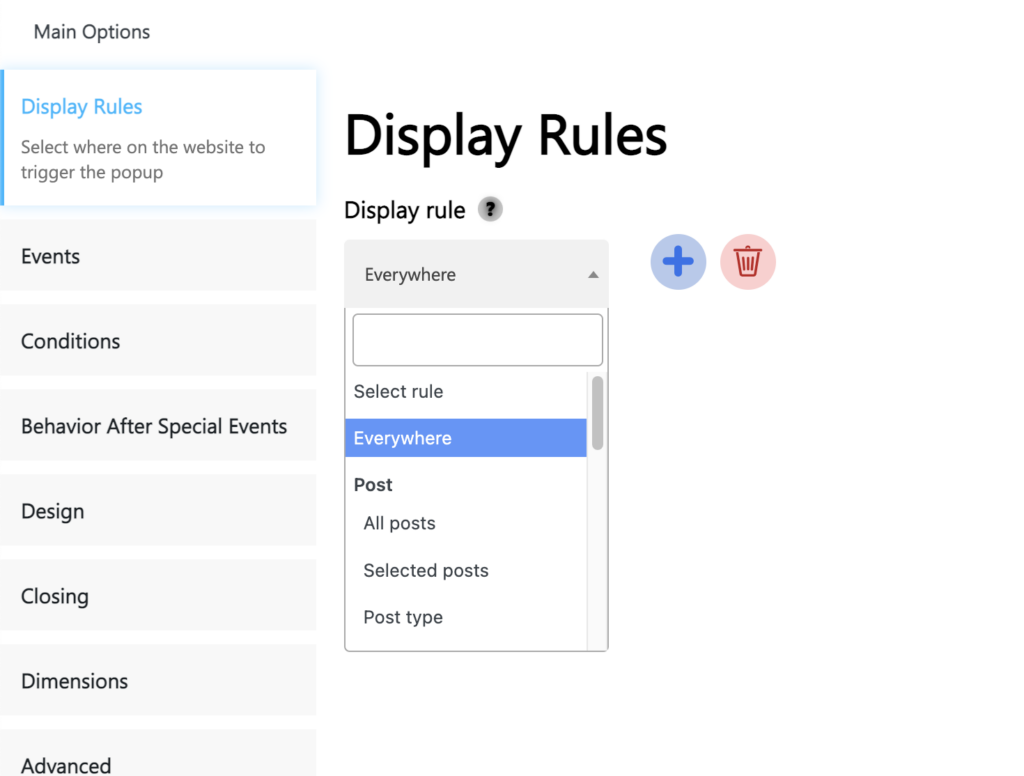
You can also choose when your popup makes its grand appearance! This can be configured in the ‘Events‘ tab. Choose whether you want your popup to show up on page load or when an element is clicked or hovered. It’s all about timing, so pick the option that works best for you and watch your popup work its magic!
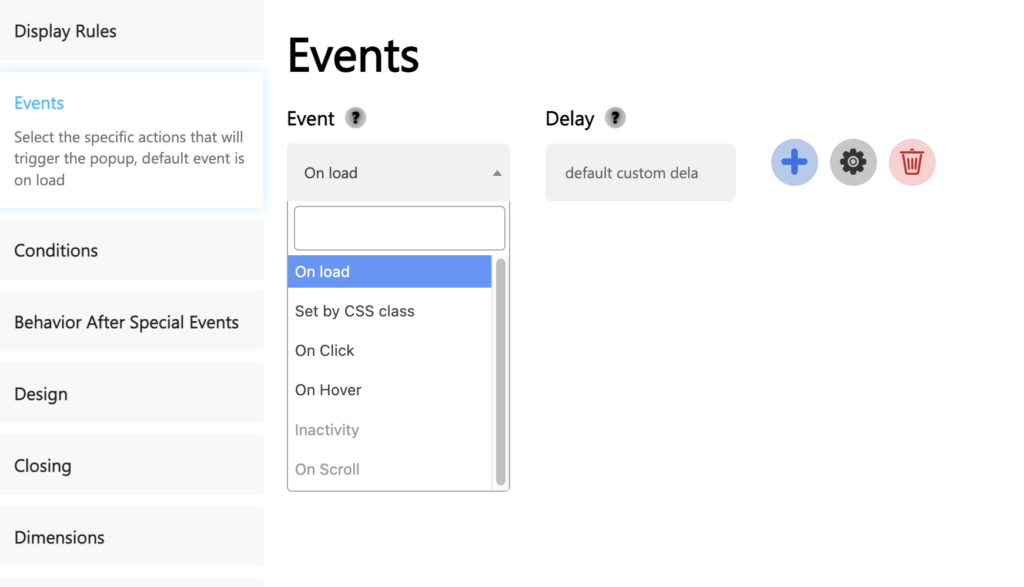
You can further tweak the other popup settings like the design, dimensions, etc to create a one-of-a-kind popup.
And once you’ve added all your fabulous popup content and fine-tuned the settings to your heart’s content, it’s time to bring your popup to life! Just hit that ‘Publish‘ button, and your popup will go live adding a dash of excitement and engagement to your website.
Wrapping it up
Popup forms are pretty awesome for interacting with your site visitors, boosting your email list, and pushing your offers. Just stick to the steps in this guide, and you’ll have a nifty popup form on your WordPress site using two of the popular popup plugin in no time. Play around with the design, triggers, and targeting options to make your popup form the best it can be!