So, you might have landed on this page ’cause you’re on the hunt for adding a date-time field to your WordPress forms, right? Well, guess what? You’re in the perfect spot! In this article, we’re gonna shine a light on one super cool Happyforms field: the Date-Time field. Ready to dive in and watch it in action? Let’s roll!
What’s the most important thing about the Date-Time field in forms?
In the world of forms, a date-time field is like your trusty sidekick for capturing submissions with dates in a way that’s easy to understand. It can handle the whole package – time, date, month, and year.
The Date-Time field within forms proves to be an invaluable asset. Its versatility shines through in various scenarios. Whether it’s the acquisition of birthdates, orchestration of events, or facilitation of appointment bookings, this field stands ready. What’s truly remarkable is its user-friendly nature, ensuring that respondents seamlessly select the appropriate date and time without any hassle.
I’ve been in a situation with a date-time field that was a real puzzle to figure out. Picture this: I’d finally pick a date from the dropdown, but then I had to hit this Ok button within a calendar. If I dared to click outside the calendar, bam, the date reset! Total facepalm moment.
But that’s not all! I once needed a date way back in the past, like 1990. Guess what? I had to manually hit the back button and practically time-travel through each year just to land on 1990. It was like running through two decades just to input the correct date. So there wasn’t even a shortcut to skip through the years. So, yep, it was a two-decade jog just to click on that elusive 1990!
I’m just highlighting a simple truth here: the top priority for a Date-Time field is its ease of use! Your form submitters shouldn’t be breaking a sweat over it. Now, with that in mind, let me assure you that the Date-Time field in Happyforms ticks all those boxes. You’ve got the smooth sailing guarantee right there! So, let’s jump in with this cool feature.
Date-Time field in Happyforms
No need to dive into the nitty-gritty of setting up the Date-Time field in Happyforms – it’s basically a drag-and-drop, and bam! Your Date-Time field is good to go. So, I’ll skip the setup chatter and instead, let’s focus on the cool stuff you can do with Happyforms’ Date-Time field. Time to unveil the awesomeness!
Though, if you want to set up one for your WordPress website, you will need the paid version of Happyforms. Just register your copy and the Date-Time field is good to go!
Happyforms’ Date-Time field features
Okay now, let’s walk you through each of the Happyforms’ Date-Time field!
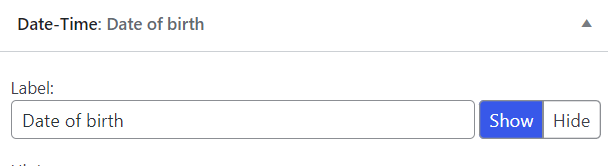
Label
This is self-explanatory. This is the label of your Date-Time field be added. Say, you want to get when will be your customer’s birthday. Then you can put the Label here: Date of birth.

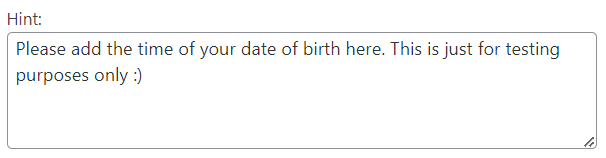
Hint
This is where you will be adding more information about your Date-Time field, so your form submitters will have assistance with what requirements you needed for your Date-Time field.

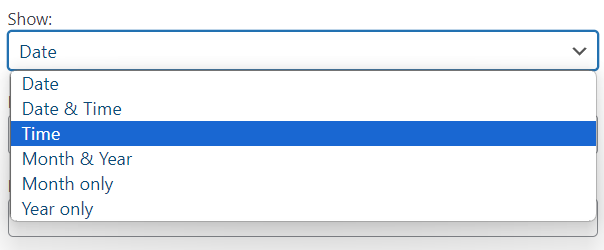
Show
This is one cool feature for the Date-Time field of Happyforms. It’s super versatile, allowing you to pick only what you actually need. So, let’s say you’re just after the time of birth – you can simply go with the Time option. That way, users can effortlessly choose the precise time for their date of birth.

Default value
This one can be self-explanatory, for the default value, you can leave your Date-Time field empty, or use the current date and time.
Max times the same answer can be submitted
In Happyforms, this option field is present in almost all of the fields. So there will be no submission that will be sent with the same date and time if you inputted 1 for this field.
Max year
This option is to set the maximum a user could input on the year for the Date-Time field
Min Year
If the user could set the maximum year, of course, you can set the minimum year also. For example, adding 1990 to it wouldn’t let the form submitter input a year later to it.
Max hour & Min hour
These options is almost the same as with the Max and Min year, we are just applying it to an hour. Very useful in mouse cases as if you have a booking form, you can set the range of time a form submitter is available to book.
Minute increments
In this field, you can select either 1, 15, or 30. Then a form submitter can increment the time by the value that is selected.
Convention
The options that are available for this field is 12-hour clock and 24-hour clock, so you can select which preference you may need.
Wrapping it up
And there you have it, folks! That’s the lowdown on using the Date-Time field in Happyforms. It’s a piece of cake to work with, offering a bunch of options that make it super versatile. You can customize it to match your preferences effortlessly. We’ve made sure it’s user-friendly, so you can wave goodbye to any worries about struggling with a Date-Time field!
If you have further questions. Feel free to ask us!