You might have already taken a look at WordPress’ Disallowed Comment Keys feature, located on the Discussion screen within the WordPress admin dashboard. If you haven’t had the chance yet, it’s definitely worth giving it a try! Why? Because this feature is incredibly useful for combating spam in comments.
So, how does it work? It’s pretty straightforward. You simply need to add specific words or an IP address. If any comments on your website contain these words or match the designated IP address, WordPress will automatically move those comments to the trash.
What are the benefits of using WordPress’ Disallowed Comment Keys for spam prevention?
Dealing with spam on your website can be a bit of a challenge, but fear not—there are plenty of tools available to help out. Picture this: You have the ability to just type in certain words or an IP address, and like magic, any comments containing those are automatically thrown into the trash. It’s like having your own spam-fighting sidekick! And trust me, there are a bunch of great things about this approach. Let me break it down for you.
You can choose to allow only the topics you’re interested in. Enable the inclusion of only desired topics. With this feature, you have the freedom to exclusively permit comments related to specific subjects. For instance, if you’re a blogger uninterested in people commenting about a particular word on your blog—let’s say redundant—this tool can save you time and effort. Comments containing this redundant word will be automatically moved to the trash
Chance to beat the spam that slips through other filters. If you find yourself in a situation where you’ve done everything—added all the spam filters, installed dedicated plugins for spam prevention—but those persistent spam messages keep slipping through, there’s a trick! So, they keep spamming you with the same old message, right? Well, here’s the solution: take a closer look at what’s consistently showing up in their comments. Then, use the power of the Disallowed Comment Keys feature and load it up with those troublesome words. Watch those pesky spam messages be moved to the trash!
Keep your guard up against spam because it evolves alongside your defences. Spam keeps evolving, coming up with new things to say. By having the freedom to update the list of words they use, you can quickly keep up with their changes and refresh the list within the Disallowed Comment Keys. This ensures your battle against spam remains dynamic and up-to-date, staying one step ahead of their updates.
How to use WordPress’ Disallowed Comment Keys in Happyforms
We’ve chatted about how awesome it is to have Disallowed Comment Keys to handle comments. But guess what? But hang tight, because here’s the really cool part: You can use it in your WordPress website’s form builder with the same magic! We all know the headache that spam can bring, especially in contact forms. But with this slick feature onboard, you’ve got yourself a solid antidote to pesky spam. So, let’s get started and see how easy this can be used in Happyforms.
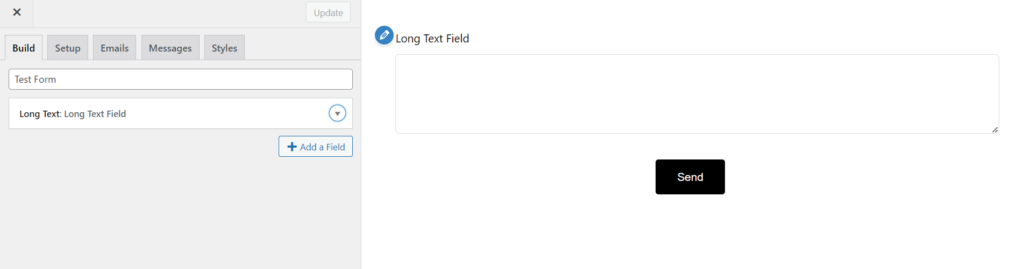
Step 1: Create a form with Happyforms
To add a form using Happyforms, start by visiting the Forms → Add New screen. Then, simply give your form a title and toss in the fields that you need for your specific form. It’s as easy as that!
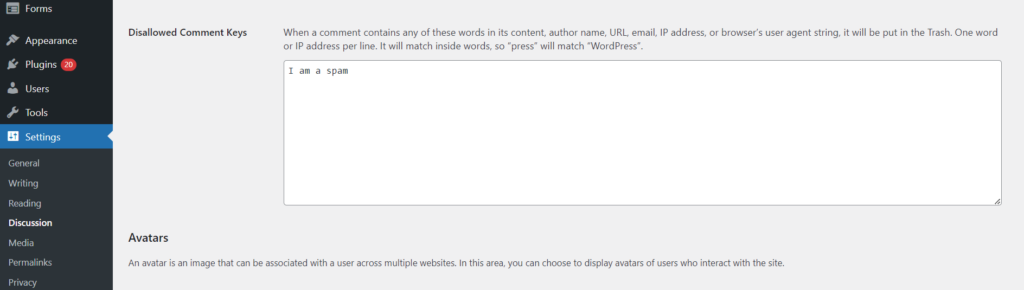
Step 2: Enable Trash submission if it contains words in Disallowed Comment Keys
To enable this option, simply head over to the Setup tab of your form builder and just tick the box for the option Trash submission if it contains words in Disallowed Comment Keys. That’s it! This feature uses the values added to your Disallowed Comment Keys under Settings → Discussion screen.

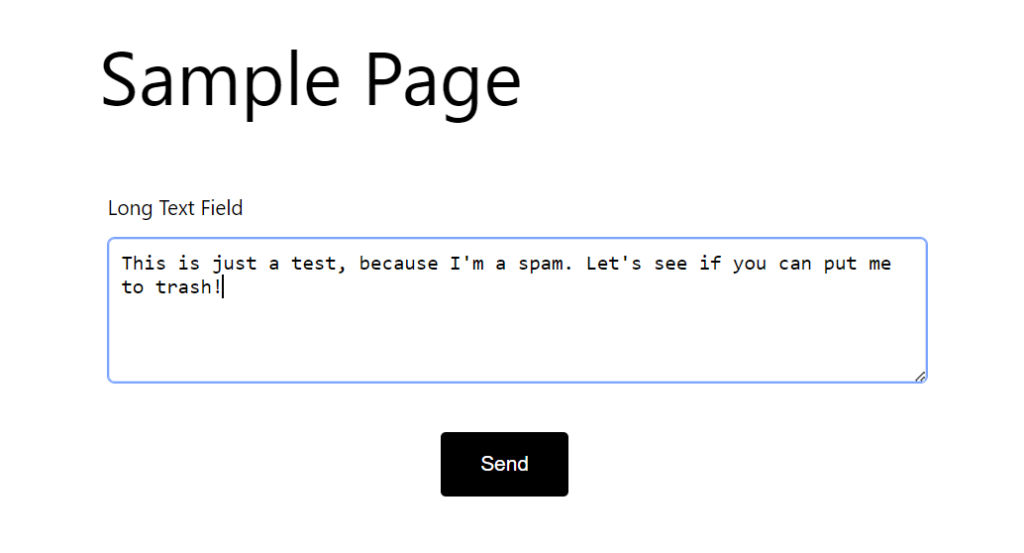
Step 3: Do some testing on your form
Great job, you’ve got everything squared away! Now, it’s time to give that form a little trial run to ensure it behaves just the way you want. Here’s the drill: start by entering any value into your Disallowed Comment Keys field. For this example, let’s use the phrase “I am a spam“.
Next, hop on over to the front end of your website and do a test submission. Make sure to slip that chosen phrase into the submission.
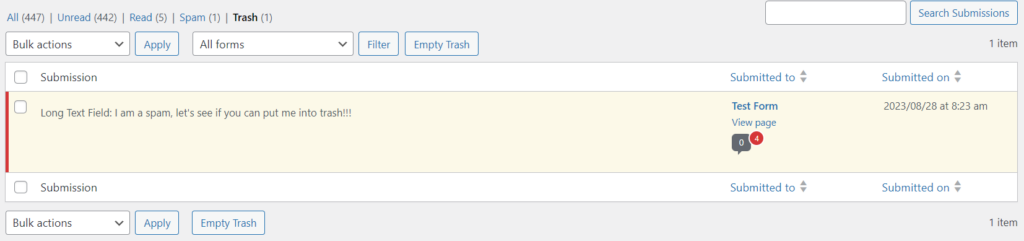
After you’ve done that, swing back to the Forms → Submissions area. If you spot your recent submission chillin’ in the Trash tab, that’s the green light — everything’s running smoothly and doing its job!
Wrapping it up
In this guide, we’ve highlighted a tool to wage war on spam for your WordPress site. Leveraging a tool like this comes with a bunch of perks that can seriously cut down on those pesky form submissions. With WordPress’ Disallowed Comment Keys on Happyforms fields, you’re now armed to take on even more spam through your contact form. Best part? It’s straightforward and doesn’t demand a ton of effort.