In this article, we’ll guide you through the process of adding a simple contact form with conditional logic. While conditional logic may initially seem advanced for a basic contact form, there are cases where its usage can enhance user engagement and improve understanding. We’ll show you how to leverage conditional logic in a user-friendly way.
Benefits of using conditional logic on WordPress forms
Conditional logic may initially appear complex when considering its use in contact forms, but there are lots of benefits it could bring to both the form owner and users. Especially, if it can easily be added to forms because of the help of form builders nowadays. With that, a simple contact form can be achieved easily with the power of conditional logic.
Using conditional logic can enhance the readability and usability of contact forms by hiding irrelevant fields that a form submitter doesn’t need such as preventing the form from appearing overwhelming—only the necessary contact form fields will be displayed, ensuring that the form submitter fills them out with the intended purpose.
Using conditional logic in forms can create an engaging and interactive experience for form submitters. This can lead to higher conversion rates and reduced form abandonment. With conditional logic, submitters only need to fill out fields that interest them, while questions that are not relevant to their interests are removed. This personalized approach makes the form more enjoyable and increases the likelihood of completion.
Moreover, removing unnecessary form fields for specific form submitters brings benefits to form owners as well. When reviewing form submissions, the removed form fields are also excluded, resulting in increased efficiency and reduced effort. This streamlined process saves time and makes it easier for form owners to manage and review form submissions.
How to add conditional logic to WordPress contact forms
In this guide, we will demonstrate how to easily implement conditional logic with WordPress forms using Happyforms. Here’s a step-by-step approach:
Step 1: Install and activate Happyforms
Conditional logic is available with the upgraded plan of Happyforms. For this step, after you’ve downloaded the plugin. Just install it to your WordPress plugin screen and activate. Enter the product registration key and done!
Step 2: Create your contact form
Create a new form by heading to Forms → Add New screen. On your form builder under the Build tab, add fields that are necessary to your contact form.
In my example, there are four fields:
- Name: This field requires form submitters to enter their name.
- Preferred Contact Method: This field is a dropdown menu where submitters can indicate if they prefer to be contacted via phone or email address.
– If the submitter selects Email from the dropdown, an additional Email address field appears where they can enter their email address.
– If the submitter selects Phone, a number field will appear so form submitters could enter their phone number. - Email address: This field will be hidden if form submitters select Phone from the Preferred Contact Method dropdown.
- Phone number: This field will be hidden if form submitters select Email from the Preferred Contact Method dropdown.

Step 3: Add conditional logic to your form
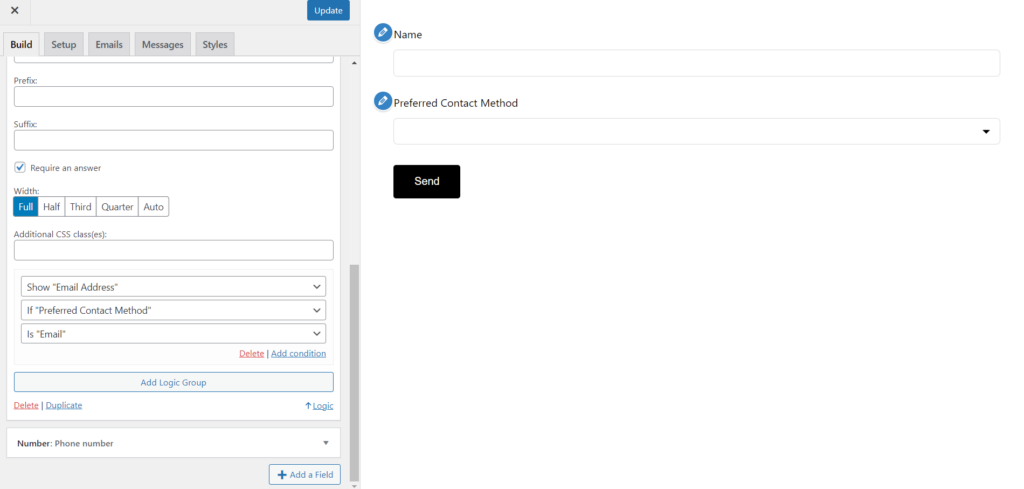
To add conditional logic, simply expand the field that will need to add conditional logic with, in our example we will going to add it to the Email address field and the Phone number field.
Hit the Logic Add Logic Group button, and choose the logic that you’ll be using—if the Preferred Contact Method dropdown selects Email, then the field Email address will be visible, then repeat the step to add conditional logic to the Phone number field.
That’s it! You already added conditional logic to your contact form.

Step 4: Do some testing
To make sure the conditional logic works correctly on your form, you need to do some testing! Once you have added the form to a page, navigate to the form’s page and verify the visibility of the Email address and Phone number fields by selecting different options from the dropdown field labeled Preferred Contact Method.
Wrapping it up
In this guide, we have explored the simple and efficient usage of conditional logic using a WordPress form plugin, Happyforms. Incorporating conditional logic into even a basic contact form can yield numerous benefits. These include improved form readability, increased form completion rates, and enhanced user experience for form submitters. The process of adding conditional logic through a WordPress form plugin is straightforward, requiring minimal time and effort.